
How to Pay with Trust Wallet
What is Trust Wallet & What Does It Do?
Trust Wallet is an easy-to-use, multi-chain, self-custody wallet that allows you to safely access Web3. It lets you securely store and manage over 10 million crypto assets, including more than 600 million NFTs, across over 100 different blockchains.
Think of it as your digital wallet for cryptocurrency - just like you carry cash and cards in your physical wallet, Trust Wallet holds your digital money on your phone.
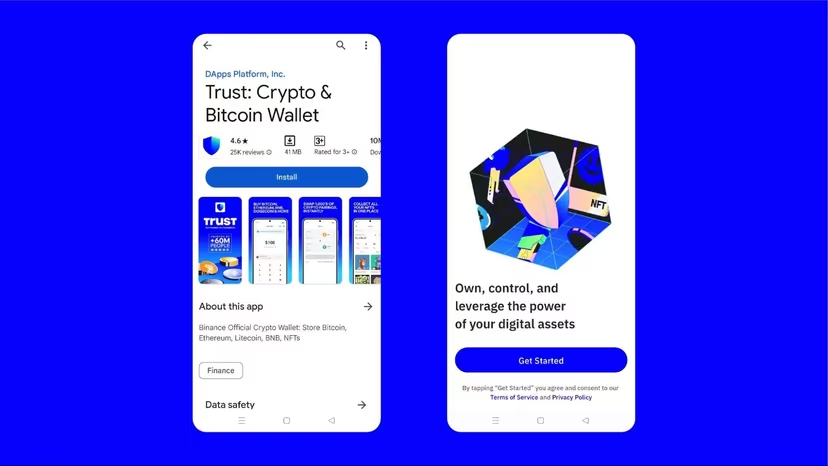
Download Trust Wallet
Install Trust Wallet on Your Mobile Device
Let's walk through setting up the Trust Wallet app on your mobile device step by step.
Step 1: Go to https://trustwallet.com/download to install Trust Wallet on your phone.
Step 2: Open the app and click on 'Get Started' to begin the setup process.
Important Note: By clicking 'Get Started,' you automatically agree to Trust Wallet's Terms of Service and Privacy Policy.
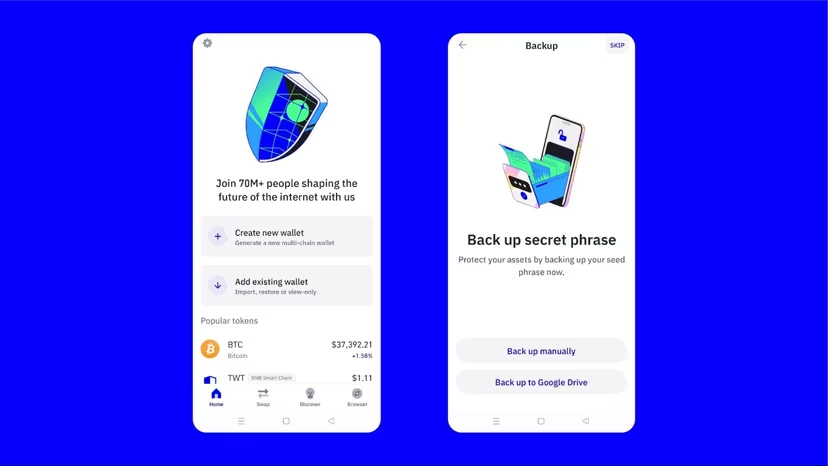
Step 3: Select 'Create a new wallet.' Trust Wallet will ask you to back up your secret phrase. You can choose to back up manually or save it to Google Drive or iCloud (for iPhone users).
For this guide, we'll choose the 'Back up manually' option, which is the most secure method.
Manual Backup - Your Secret Recovery Phrase
To manually back up your Trust Wallet, you'll need to write down a 12-word secret phrase. This phrase is like a master key that will let you recover your wallet if you lose your phone or need to reinstall the app.
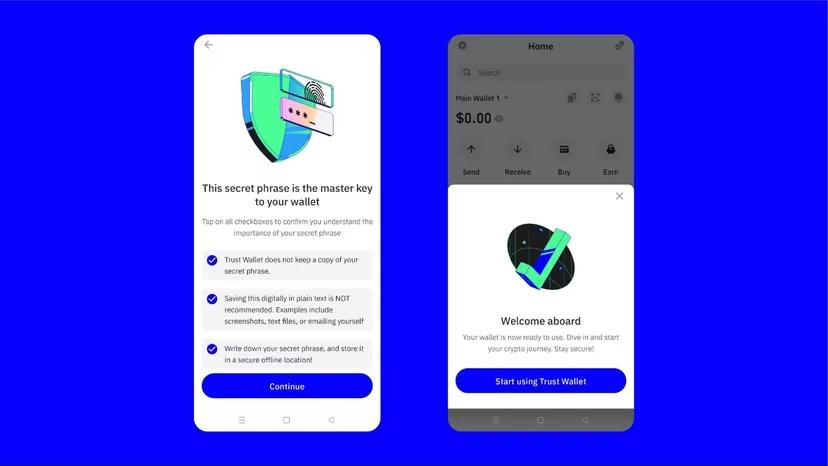
Step 1: Accept the Trust Wallet guidelines and click 'Continue.'
Step 2: Carefully write down the 12-word secret phrase in the exact order shown and click 'Continue.'
Step 3: You'll need to verify by selecting four random words from your seed phrase in the correct order. Select the four words and click 'Confirm.'
Set Up Security Protection
Step 1: Create a six-digit passcode or set up biometric protection (fingerprint or Face ID). This adds an extra layer of security when using Trust Wallet.
Step 2: Confirm your passcode and complete the wallet backup process.
Congratulations! You have successfully created your Trust Wallet and are ready to start buying, selling, and managing digital currencies on your smartphone.
Critical Security Warning
Critical Security Warning
Your 12-word secret phrase is extremely important. If you lose it, you lose access to your account and all your funds forever. No one can help you recover it.
Here are safe ways to store your Trust Wallet secret phrase:
- Write it on paper and keep it in a secure location (like a safe)
- Store it in a password manager
- Engrave it on a metal sheet for maximum durability
Never: Take a screenshot, email it to yourself, or share it with anyone.
How to Buy Crypto with Trust Wallet
Buying Bitcoin Step by Step
To buy Bitcoin with Trust Wallet, follow these simple steps:
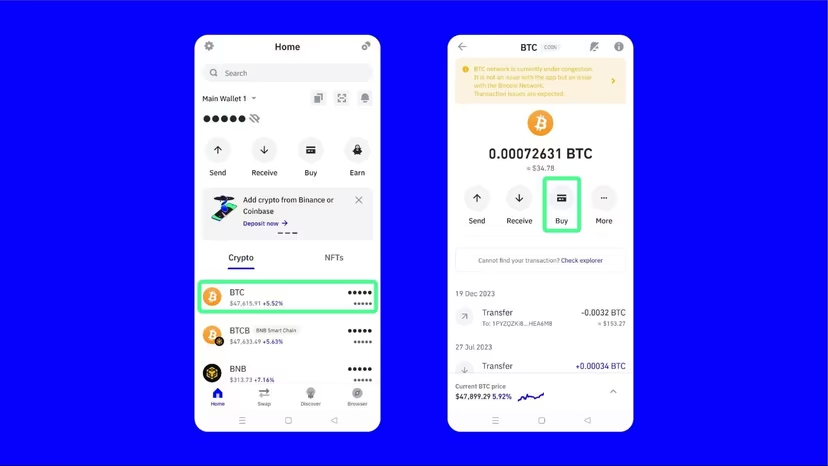
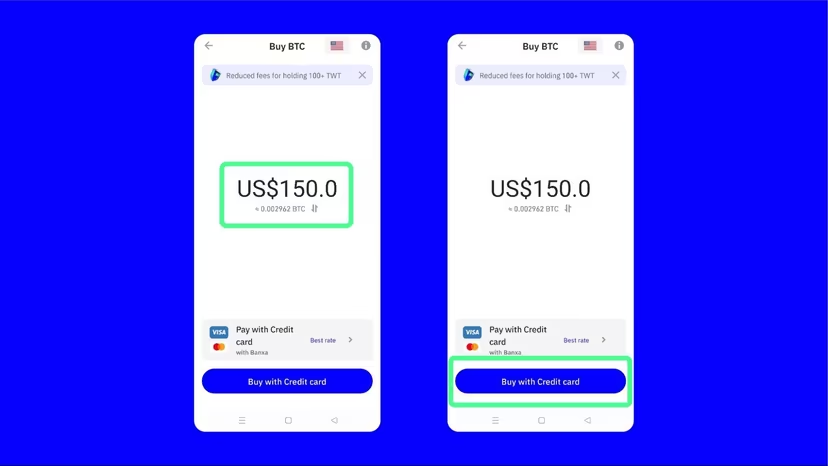
Step 1: Go to your Main Wallet, click on 'Bitcoin,' and then select 'Buy'.
Step 2: Enter how much Bitcoin you want to buy (you can enter either the dollar amount you want to spend or the amount of Bitcoin you want).
Step 3: Once you've entered the amount, click 'Buy with Credit card' to continue with the purchase.
Important Note: Trust Wallet doesn't sell crypto directly. Instead, all purchases are made through trusted third-party providers.
Choosing Your Payment Provider
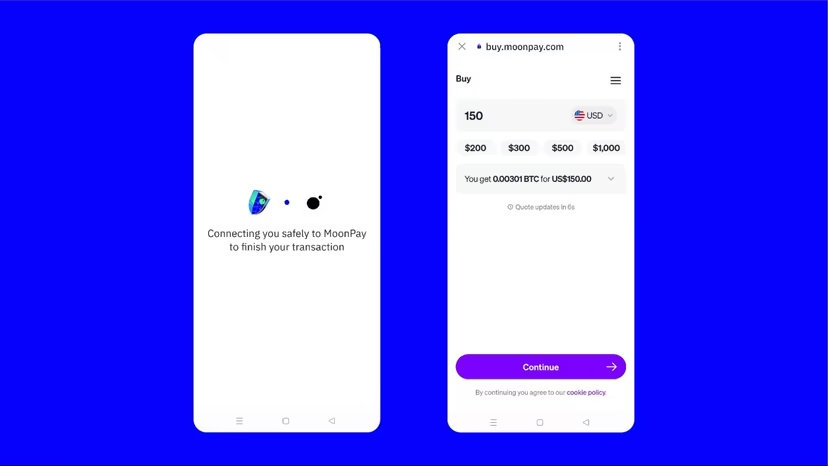
You can also click the 'Pay with Credit' button to see a list of different payment providers. Each provider may offer different rates and payment methods, so you can choose the one that works best for you.
For this guide, we're using MoonPay as our third-party provider to buy Bitcoin.
Step 1: After selecting MoonPay, Trust Wallet will redirect you to the MoonPay website to complete your purchase.
Step 2: On MoonPay, you can choose which currency you want to use to buy Bitcoin (USD, EUR, etc.).
Step 3: MoonPay will show you exactly how much Bitcoin you'll receive in your Trust Wallet once the transaction is complete.
Completing Your Purchase
Step 1: Confirm the amount on the MoonPay site and click 'Continue.'
Step 2: Enter your email address and click 'Continue.' MoonPay will send you a six-digit verification code.
Step 3: Enter the verification code and click 'Continue.'
Step 4: MoonPay will ask for your personal details including your name, date of birth, billing address, and debit card information. This is required for security and legal compliance.
Step 5: Review all details and confirm the transaction.
Success! If your purchase is successful, you'll receive a notification, and your Bitcoin will be deposited into your Trust Wallet as soon as the transaction is processed.

How to Send Bitcoin
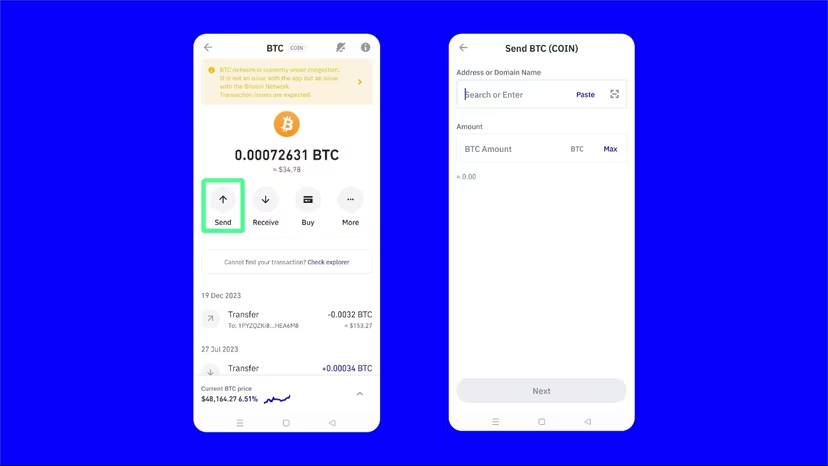
Step 1: Go to your Main Wallet and click on 'Bitcoin.'
Step 2: Click on 'Send.'
Step 3: Enter the wallet address where you want to send Bitcoin and the amount you want to send, then click 'Continue' in the top right corner.
Important: Always make sure you have enough Bitcoin in your wallet to cover the transaction fee (also called network fee or gas fee).
Step 4: Review the transaction details and confirm. You'll be able to see the transaction status under your Bitcoin tab.
How to Receive Bitcoin
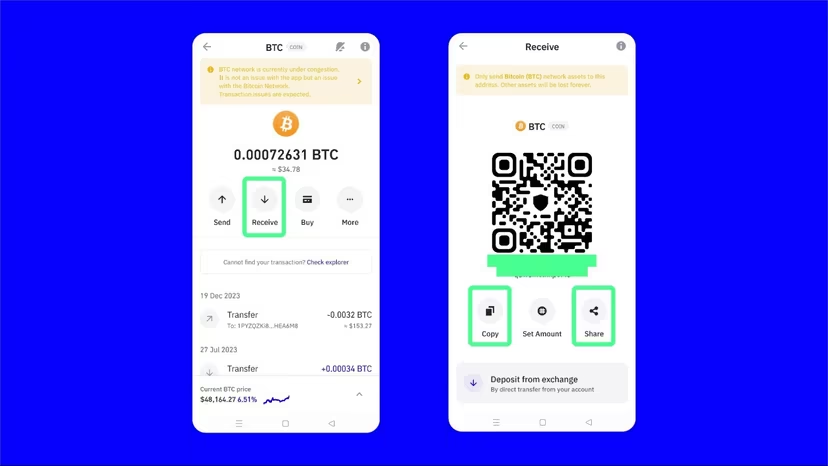
Step 1: Click on the 'Receive' option in your Bitcoin wallet.
Step 2: Copy your Bitcoin wallet address or share it directly with the person who is sending you Bitcoin.
Your wallet address is like your bank account number - it's safe to share with others when you want to receive payments.
Step 3: Once the sender processes the transaction, you'll get a notification from Trust Wallet, and the transaction will appear under your Bitcoin tab.
That's it! You now know how to use Trust Wallet to buy, send, and receive Bitcoin and other cryptocurrencies.
Key Terms You Need to Know
Cryptocurrency Basics
Cryptocurrency: Digital money that exists only online. Unlike regular money from banks, it's not controlled by any government or central authority.
Bitcoin (BTC): The first and most well-known cryptocurrency. Think of it as digital gold that you can send to anyone in the world instantly.
Blockchain: A digital ledger that records all cryptocurrency transactions. It's like a permanent, public record book that can't be changed or faked.
Wallet Address: Your unique identifier for receiving cryptocurrency. It's like your bank account number, but for digital money. Safe to share when you want to receive payments.
Wallet and Security Terms
Crypto Wallet: An app or device that stores your cryptocurrency. It doesn't actually hold the coins, but holds the keys to access them on the blockchain.
Self-Custody Wallet: A wallet where YOU control your cryptocurrency, not a bank or company. This means you're responsible for keeping it safe.
Seed Phrase (Recovery Phrase): A list of 12 or 24 words that acts as a master key to your wallet. If you lose your phone, these words can restore access to your funds.
Private Key: A secret code that proves you own your cryptocurrency. Your seed phrase generates this key. Never share it with anyone.
Public Key: The address others can use to send you cryptocurrency. It's safe to share publicly.
Transaction Terms
Transaction Fee (Gas Fee): A small fee paid to the network to process your transaction. Like a postal stamp for sending digital money.
Confirmation: When the network verifies and records your transaction. More confirmations = more secure.
Network: The blockchain system your cryptocurrency runs on (like Bitcoin network, Ethereum network, etc.).
Advanced Terms
Web3: The new version of the internet built on blockchain technology, where users control their own data and money.
DeFi (Decentralized Finance): Financial services (like lending, trading) that work without traditional banks, using smart contracts instead.
NFT (Non-Fungible Token): Unique digital items (like digital art, collectibles) that are stored on the blockchain.
Multi-Chain: Ability to work with multiple different blockchain networks in one wallet.
Third-Party Provider: External companies (like MoonPay) that help you buy cryptocurrency with regular money. Trust Wallet partners with them but doesn't sell crypto directly.
Security Warnings
Phishing: Fake websites or apps that try to steal your wallet information. Always double-check URLs and only download from official sources.
Scam: Fraudulent schemes to steal your cryptocurrency. Common red flags: promises of guaranteed returns, urgent requests for your seed phrase, or "too good to be true" offers.
NEVER share your seed phrase or private key with anyone - not even customer support!
Payment and Purchase Terms
Fiat Currency: Traditional money like US Dollars, Euros, or British Pounds. The "regular" money you're used to using.
Exchange Rate: How much of one currency you get for another. For example, how many dollars you need to buy one Bitcoin.
KYC (Know Your Customer): The process where companies verify your identity before letting you buy cryptocurrency. You'll need to provide ID and personal information.
Verification Code: A temporary code sent to your email or phone to confirm it's really you making the transaction.
Processing Time: How long it takes for your cryptocurrency purchase or transfer to complete. Can range from minutes to hours depending on the network.
How to Send Bitcoin - Your Wallet Options
Good News: Any Bitcoin Wallet Can Send Bitcoin
The great thing about Bitcoin is that you can send it from any legitimate Bitcoin wallet to any other Bitcoin wallet. It doesn't matter which app, website, or service you use - as long as it supports Bitcoin, you can send payments to anyone in the world.
Think of it like email - you can send an email from Gmail to Yahoo, from Outlook to Apple Mail, or between any email providers. Bitcoin works the same way!
Popular Bitcoin Wallet Options
Mobile Wallet Apps (Self-Custody)
Download Trust Wallet
Download Exodus
Download Electrum
Download BlueWallet
Download Mycelium
Exchange Wallets (Custodial)
Visit Binance
Visit Crypto.com
Visit Coinbase
Visit Kraken
Visit KuCoin
Visit Gemini
Hardware Wallets (Maximum Security)
Buy Ledger
Buy Trezor
Buy KeepKey
Desktop Wallets
Download Bitcoin Core
Download Atomic Wallet
Download Wasabi
Web Wallets
Visit Blockchain.com
Visit BitPay
How Bitcoin Sending Works
Regardless of which wallet you choose, the process is always similar:
- Step 1: Open your wallet app or website
- Step 2: Find the "Send" or "Transfer" button
- Step 3: Enter the recipient's Bitcoin address
- Step 4: Enter the amount you want to send
- Step 5: Review the transaction fee
- Step 6: Confirm and send
Important Things to Know
Transaction Fees
All Bitcoin transactions require a network fee (also called mining fee). This fee goes to the Bitcoin network, not to your wallet provider. Fees can vary based on network congestion.
Transaction Time
Bitcoin transactions typically take 10-60 minutes to confirm, depending on network traffic and the fee you pay. Higher fees usually mean faster confirmation.
Double-Check Addresses
Bitcoin transactions cannot be reversed! Always double-check the recipient's address before sending. One wrong character means your Bitcoin could be lost forever.
Small Test First
If you're sending a large amount, consider sending a small test amount first to make sure everything works correctly.
Choosing the Right Wallet for You
For Beginners:
Exchange wallets like Coinbase, Binance, or Crypto.com are easiest to start with. They handle security for you and have customer support.
For More Control:
Mobile wallets like Trust Wallet or Exodus give you full control while remaining user-friendly.
For Maximum Security:
Hardware wallets like Ledger or Trezor are best for storing large amounts long-term.
For Daily Use:
Mobile wallets are most convenient for regular transactions and payments.
Security Tips for Any Wallet
- Never share your private keys or seed phrase
- Use strong, unique passwords
- Enable two-factor authentication when available
- Keep your wallet software updated
- Back up your wallet regularly
- Only download wallets from official sources
Remember: The wallet you choose is less important than using it safely. Any reputable Bitcoin wallet can send and receive Bitcoin to any other Bitcoin wallet in the world!